Running Jobs
Quick Start Guide to Running Jobs on Leavitt
Once you have gained access to the Leavitt cluster (see access request page), you will be able to access Leavitt via SSH using a suitable terminal application, such as Terminal (Mac machines) or PuTTY (Windows machines).
Jobs on Leavitt are typically run from the command line using the terminal application of your choosing and the bash shell, so it is a good idea to gain some basic familiarity with these tools if you plan to be using the cluster regularly (see FAQ page for a list of guides and video tutorials).
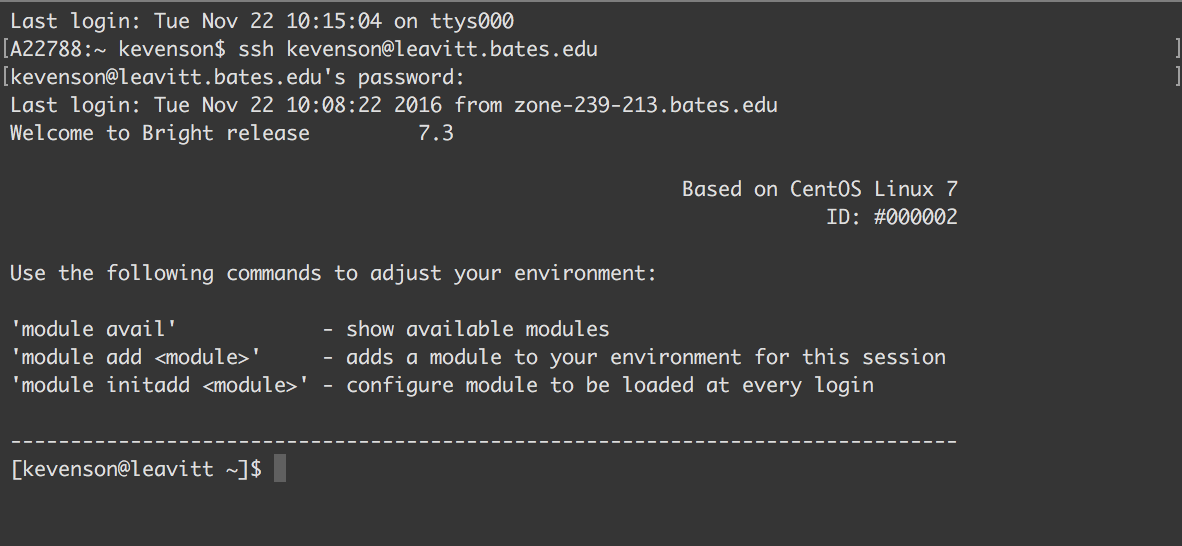
To login to Leavitt with your terminal application, simply type: ssh leavitt.bates.edu
To login to Leavitt using PuTTY, simply enter leavitt.bates.edu in the Host Name field, and make sure the Connection type is set to SSH.
Once you enter your standard Bates username and password, you will be brought to your home directory on the Leavitt cluster:
Running jobs on Leavitt typically involves a couple steps: first, the appropriate modules are added to your environment, giving you access to the software packages or compilers your job needs to run. Second, you submit the job to the job scheduling system, Slurm, which also allows you to monitor your submitted jobs.
We will review each of these steps in detail in the following sections.
Modules
The Modules package allows users to dynamically configure their environment to run specific software packages and libraries. It also allows us to support potentially thousands of applications in a single system.
However, it is important to note that not all software packages use Modules. Common software packages that many users or core software will need (e.g. Python 2.7 and editors like vi/vim or emacs) are simply available on the system. Modules are used to customize the computing environment for specific users, for example to load a particular GNU or Intel compiler.
More information about the Modules package can be found on the module man-page (short for manual page), which you can access by typing and executing ‘man module’ at the command prompt once you’ve logged into Leavitt.
Here are a few of the most important commands:
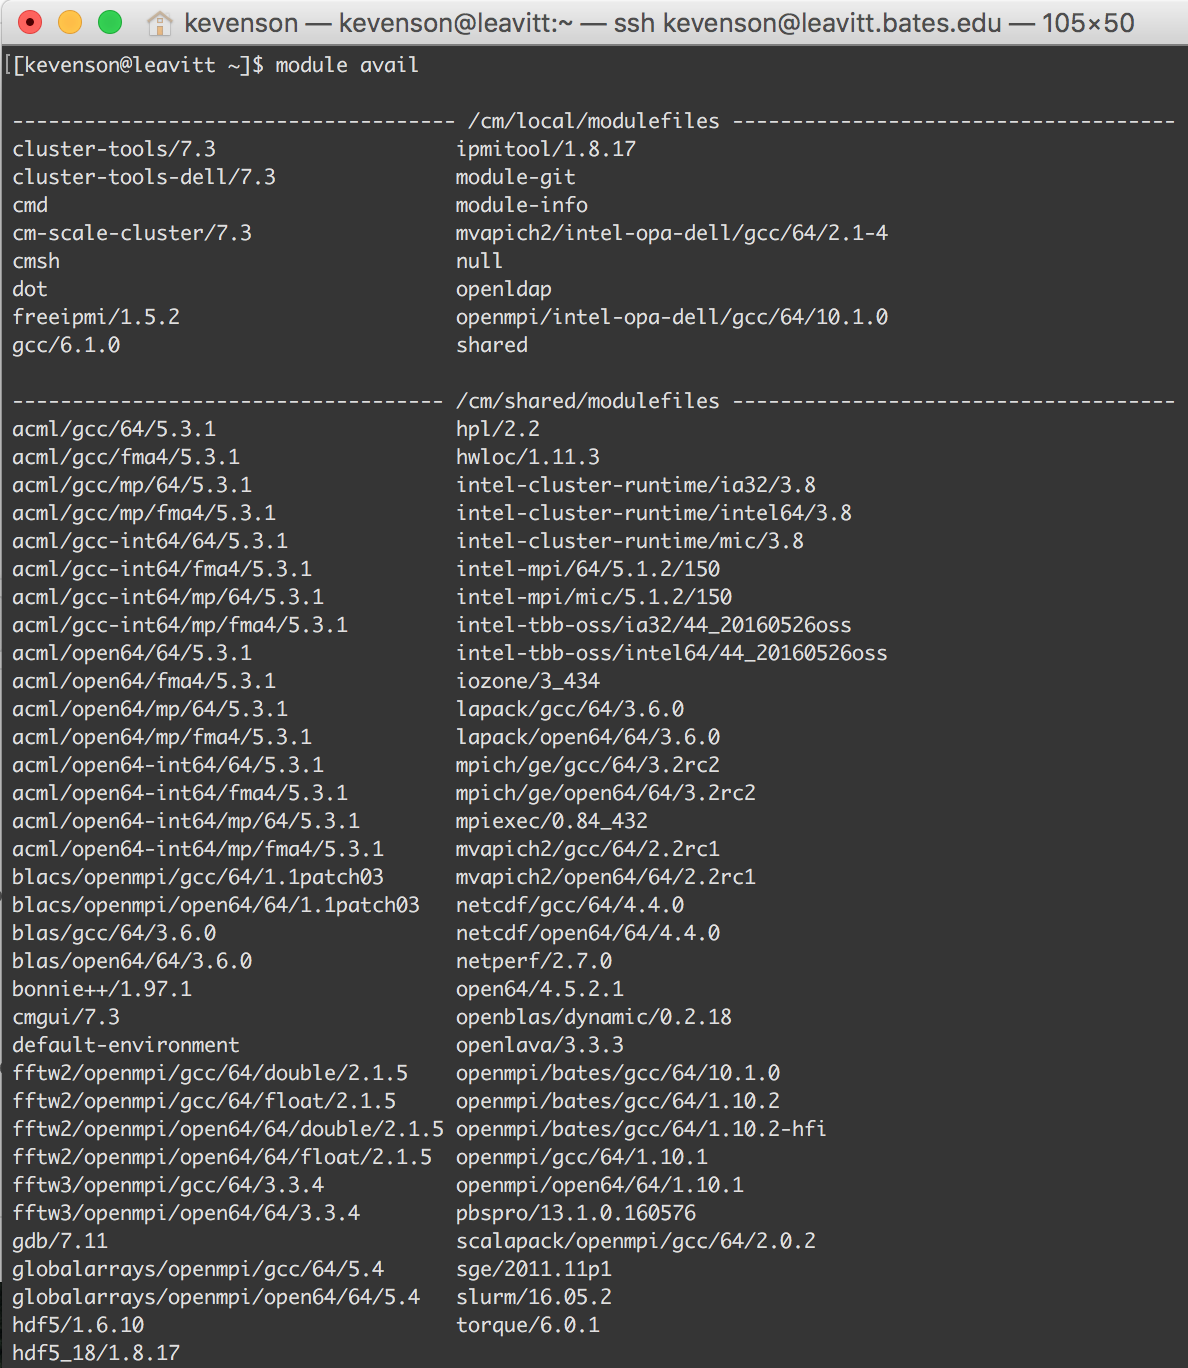
module avail
The module avail command will print a list of the available modules, or modulefiles. You should use this command as a guide when you need to load a particular module, as some of the modules have similar names and the list of available modules will change periodically as we add new software to the system.
module add <module>
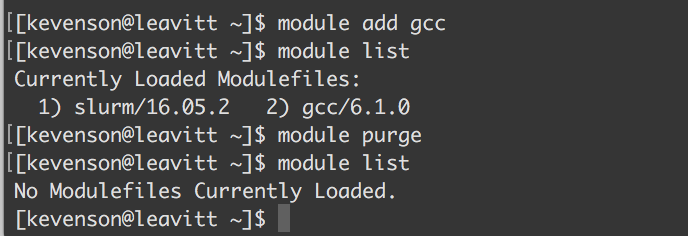
The module add command (where <module> is the name of the module to be added) allows you to load a particular module into your shell environment. For example, executing module add gcc adds the 6.1.0 implementation of the GNU Compiler Collection to your environment.
It’s worth noting that some software packages or standards have multiple implementations available on Leavitt via distinct modules, such as the multiple Open MPI implementations shown here:

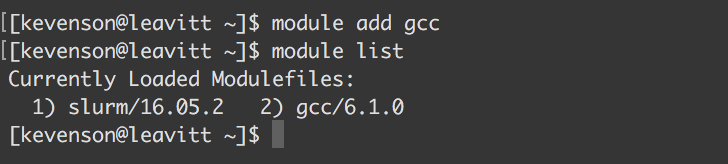
module list
The module list command will return a list of all the currently loaded modules:
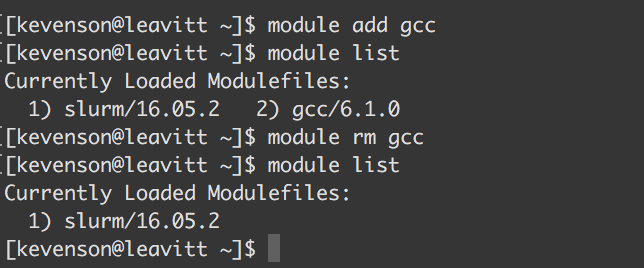
module rm <module>
The module rm command (where <module> is the name of the module to be removed) will remove the specified module from your environment. This can be helpful if you need to, for example, switch compilers.
module purge
Not to be confused with the above, the module purge command will remove all modules from your environment.
module initadd <module>
The module initadd command allows more advanced users to add modules to the shell’s initialization file (.bashrc) in the user’s home directory so that these modules will be automatically loaded in future sessions. If you need to make changes to your .bashrc file in the future, you can edit the file with an editor like vim or emacs, or use the module initrm <module> command.
Note that this command does not load modules in the current environment. To do this you need to either start a new session or reload your .bashrc file using one of the following commands:
source ~/.bashrc
or
. ~/.bashrc
One of the default modules, preloaded for all users, is Slurm.
Slurm
Slurm, or Simple Linux Utility for Resource Management, is an open-source cluster management and job scheduling system widely used on high performance computing clusters like Leavitt. Slurm is one of the most important software packages on Leavitt, where it is used to (1) allocate access to compute resources for users, (2) provide a framework for running and monitoring jobs, and (3) manage a queue for submitted jobs. As such, it is important for Leavitt users to have some familiarity with Slurm.
This documentation will provide an introduction to some of the most important concepts and commands, but there are many resources available online through a simple Google search (http://slurm.schedmd.com/ is a good place to start). Additionally, you can always find documentation on a particular command when logged into Leavitt via the manual page (man-page):
man command
(e.g. “man sinfo” to see manual information on the sinfo command).
Common Slurm Commands
sinfo
Executing the sinfo command will show you information about the available compute nodes and partitions on Leavitt, including information about job limitations on each of the partitions, such as time limits (for a more in-depth description of each of the partitions, see the Slurm Partitions section).
Like most commands, there are many options available for output (view the sinfo man-page for a list). For example, you can view more detailed information about the available partitions by using the the –long option (e.g. sinfo --long (-l for short):

squeue
Use the squeue command to view a list of jobs that have been submitted to the Slurm scheduling queue. This is a useful way to monitor jobs that have been submitted, and also to retrieve job ID’s, which are necessary to cancel or get statistics on jobs (see scancel and sacct sections below).
To view only jobs submitted by a particular user, use the -u option, e.g. squeue -u kevenson
sbatch
The sbatch command is used with serial batch jobs, and typically includes a submission script. For example, executing sbatch myscript.sh would submit the myscript.sh shell script to Slurm.
Submission scripts may also include options preceded by #SBATCH to set key job parameters, such as the partition to be used, memory, nodes, etc.
See the examples below or the sbatch man-page for more information.
srun
The srun command can be used to run parallel and interactive jobs with Slurm. It can be used within an existing job (e.g. in a script submitted using sbatch), or as a way to create a new job allocation and spawn an application (e.g. for X11 forwarding to run a graphical application like Jupyter Notebook or Matlab).
scancel
The scancel command provides a simple way to cancel Slurm jobs. There are a few ways this can done, but here are a few of the most frequently used options:
To cancel one job: scancel <jobid>
To cancel all the jobs for a user: scancel -u <username>
To cancel all the pending jobs for a user: scancel -t PENDING -u <username>
The scancel command can also be used to cancel Slurm job arrays and job steps–see the man-page for more information.
sacct
sacct displays accounting information for jobs submitted to Slurm and saved in the accounting log or Slurm database. This is a good way to retrieve basic statistics about a particular job.
For example, to retrieve stats for a completed job: sacct -j <jobid> --format=JobID,JobName,MaxRSS,Elapsed
Submitting Batch Jobs
The most common way to run jobs on Leavitt is to submit a script to Slurm using the sbatch command. Submissions scripts will vary based on the specifics of the jobs being run, but there are a few common components, which we’ll review in the example scripts below.
Example 1: myfirstscript.sh
This is a very simple script, created on Leavitt using the vi editor and titled myfirstscript.sh. (To create the script, you can use the touch command, e.g. touch myfirstscript.sh; to then edit the script with the vi editor, you would execute vi myfirstscript.sh).
To submit the script, we’d simply execute sbatch myfirstscript.sh at the command prompt, and Slurm would give us our job ID:

We’ll go through the script line-by-line below, but it is worth noting the three main components first:
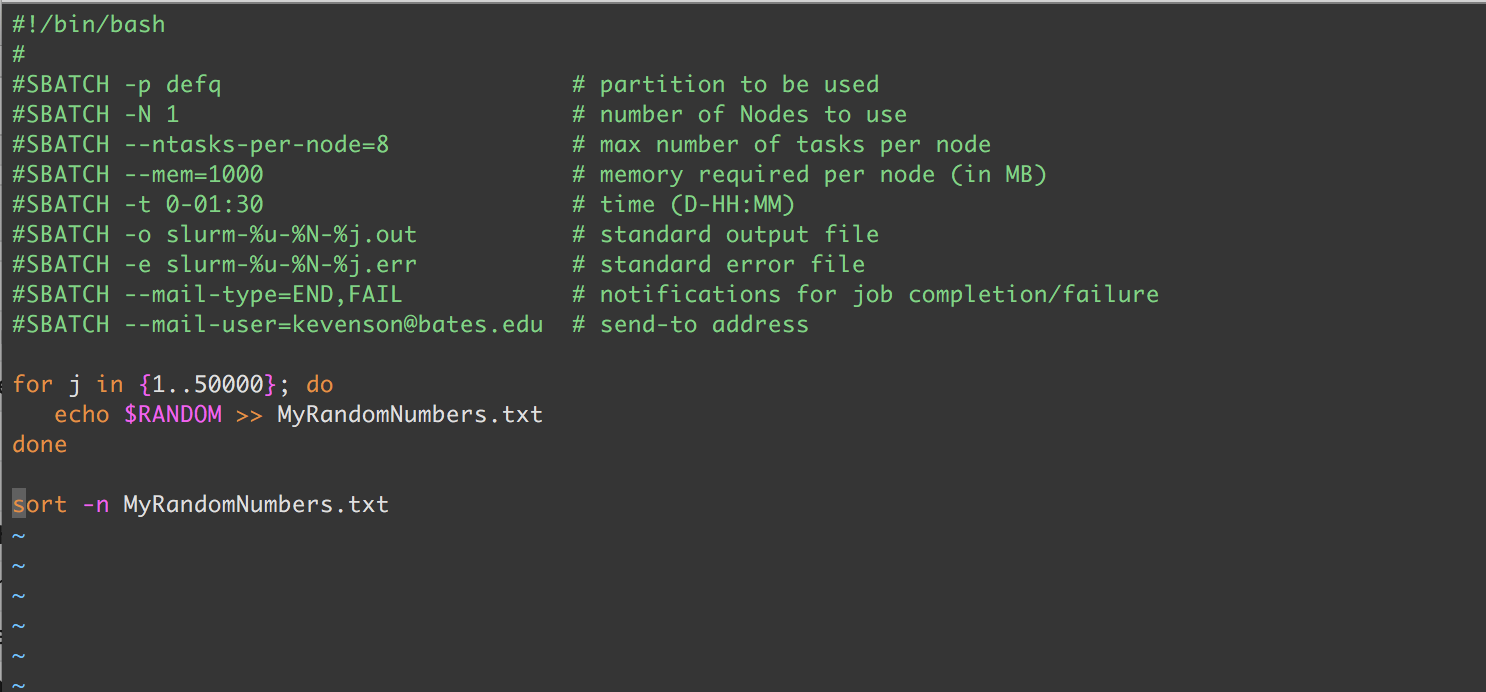
- The first line of this script tells the system which interpreter to use. This is sometimes called the shebang or hashbang line. The syntax is standard in Unix-like systems, with the number sign and an exclamation point (#!) followed by the path to the interpreter to be used:
#!/path/to/interpreter. - The #SBATCH lines (e.g.
#SBATCH -p defq), which make up the bulk of this particular script, are used by Slurm to set key parameters for the job. The text that you see following “#SBATCH” are the options specifying these parameters. See https://slurm.schedmd.com/sbatch.html or the sbatch man-page for more information. - The last part of the script, in this trivial example beginning with “for j in…” is the most important part–this is the code that comprises most of the job steps, or tasks that must be done for your job to complete, such as modules to load or algorithms to solve (another job step is the script itself).
#!/bin/bash
As noted above, this is the shebang line that tells the system what interpreter to use. When the script above is run, the /bin/bash text tells the system to run the script using the bash shell found in the /bin directory.
Another example of a shebang line, this one for Python 2.7 users, would be #!/usr/bin/python
#SBATCH -p defq
The -p option in this line tells Slurm what partition to use. In this case, it’s telling Slurm to use the defq partition, which also happens to be the default partition that all Leavitt users have access to.
Note: the partition used for a job determines many of the options that will be available. For example, the defq has a maximum job size of 6 nodes. To see a list of partitions and their usage options, see the SECTION BELOW, or use the sinfo -la command for a summary.
#SBATCH -N 1
The -N option tells Slurm how many nodes to allocate to this job. In this case, only one node is being requested.
#SBATCH --ntasks-per-node=8
The –ntasks-per-node=<ntasks> option tells Slurm how many tasks to invoke on each node, and will be treated as a maximum count of tasks per node. Note: this is meant to be used with the -N option, above.
maximum number of tasks for which it needs to allocate resources. The default is for one task per node, so this essentially tells Slurm how many cores to allocate to the job. (Remember, each node has 2 CPU’s/sockets, each with 14 cores.)
#SBATCH --mem-1000
The –mem option tells Slurm how much memory you expect to be required per node in megabytes. In this particular case, 1000MB were requested (note that in the core Leavitt cluster, each of the compute nodes has 128GB of memory).
Remember: Leavitt is a shared resource, so it is very important that you make accurate requests for the amount of memory you need. If insufficient memory is requested, your job may fail. On the flip side, if you request much more memory than you need for your job, you may be taking resources that another Leavitt user needs.
#SBATCH -t 0-01:1:30
The -t option allows you to set a limit on the total run time for your job. Multiple formats are acceptable (see the sbatch man-page for more information), but in this example, a time limit of 1 hour and 30 minutes was imposed.
Note that this option may have no real bearing on how long your job takes to actually run. In this example, the job completed in approximately 19 seconds.
#SBATCH -o slurm-%u-%N-%j.out
The -o option tells Slurm to direct its output to the filename specified. The filename pattern can include a number of replacement symbols. In the example above, the ‘%u’ is replaced with the username associated with the job, the ‘%N’ is replaced by the name of the node that runs the script and ‘%j’ is replaced by the job allocation number—resulting in an output file called slurm-kevenson-node001-242.out.
#SBATCH -e slurm-%u-%N-%j.err
Similar to the above, the -e option tells Slurm to direct its standard error directly to the filename specified. The filename pattern options are the same, so this particular line results in an error file called slurm-kevenson-node001-242.err.
#SBATCH --mail-type=END,FAIL
#SBATCH --mail-user=kevenson@bates.edu
The –mail-type and –mail-user options tell Slurm (a) to notify a user by email when certain event types occur (here END and FAIL) and (b) what user should be notified when these events occur.
See the sbatch man-page for more type values.
for j in {1..50000}; do
   echo $RANDOM >> MyRandomNumbers.txt
done

sort -n MyRandomNumbers.txt
These remaining lines comprise the real work you want to do. The for loop generates a long, long list of random numbers, which are appended to the file MyRandomNumbers.txt. This is then sorted in ascending order in the output file.
So, nothing too interesting in this example but this is where you would instruct Slurm to load particular modules, open another script with your custom software or perform additional job steps with the srun command.
Slurm Partitions
Partitions in Slurm are essentially queues for jobs. Partitions all have differing levels of access to the resources available on the Leavitt cluster. You may have access to different partitions based on your user type (e.g. if you are a faculty member or a student), and you may choose to use different partitions based on the types of jobs you need run.
As of this writing, the Leavitt cluster is composed of 11 Dell PowerEdge 430’s compute nodes and one Dell PowerEdge 730XD head node. Each of the compute nodes has 128GB of memory and dual Intel Xeon E5-2680 processors, each with 14 cores running at 2.40GHz, for a total of 308 cores and 1.4 terabytes of memory. The head node has an additional 48 terabytes of disk storage, which is shared amongst the compute nodes. The 12 nodes are also connected by an Intel Omni-Path switch, which provides very high speed (100 gigabits/second) network access between each member in the cluster.
Below is an overview of the available partitions on Leavitt.
defq
The defq or default queue is available to all Leavitt users, including students. This queue has access to a maximum of roughly half of Leavitt’s resources for a maximum of 48 hours, making this an appropriate partition for classroom work.
- Max compute nodes: 6 (12 sockets / 168 total cores)
- Max job time: 48 hours
- Default time: 2 hours
Note that if you do not specify a partition when you submit your job, it will automatically run on this partition.
faculty
The faculty queue is available to all Leavitt faculty and staff users. This queue has access to all Leavitt’s resources, but jobs submitted to this queue have a lower priority than jobs submitted to the contributor queue, detailed below.
- Max compute nodes: 11 (22 sockets / 308 total cores)
- Max job time: 15 days
- Default time: 6 hours
contributor
The contributor queue is restricted to faculty who have contributed to the expansion of the Leavitt cluster’s resources, e.g. through grant applications or the purchasing of additional nodes through startup funds.
- Max compute nodes: 11 (22 sockets / 308 total cores)
- Max job time: unlimited
- Default time: 10 days
interactive
tbd