Blog Posts Tutorial
What does a Blog on WordPress look like? Should I use one on my site?
You can use blogs to post recaps of recent events, updates for future changes in the department, and in many other ways.
In order to create a blog on WordPress, you will need to use the posts feature.
Posts differ from pages because there will be an author and date of publication associated with a post.
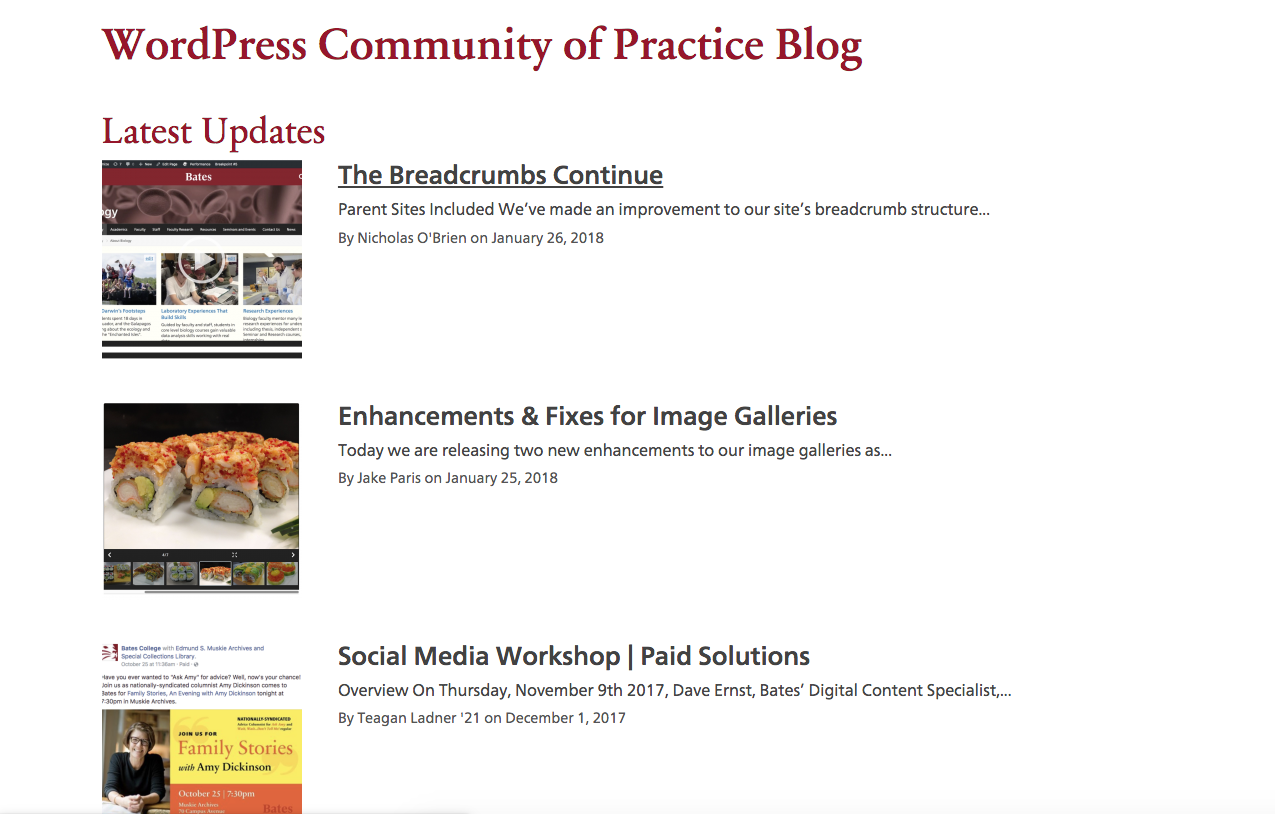
To see a blog in action, check out our WordPress Community of Practice Blog.
How to create a Blog Post
In order to use the blog shortcode, you need to create the content it will be retrieving. Instead of creating pages, you will be creating “posts,” which are similar to pages, but slightly different. To learn how to create a post, watch the video or follow the steps below:
To recap, here are the basic steps to create a blog post:
- Go to your site’s dashboard
- Click “Posts” on your lefthand sidebar
- “Add new” and insert your content
- Set a category for your blog post. Click “+Add New Category” to make your own.
- Click “Set featured image” in the bottom corner of the right sidebar if you want a clickable image to appear on the final blog.
- Save draft and preview before clicking “Publish”
How to retrieve Blog Posts (using the blog shortcode)
Once your posts are published, you will want to create a page to retrieve them all in one place. In order to do so, watch the video or follow the following instructions:
- Click on “Pages” on your dashboard’s lefthand sidebar
- Click “Add New” and type your title in the text box
- Type the shortcode [ blog category=”demo”] in the text area
*(except delete the extra space in between the opening bracket and the word blog and replace demo with whatever your category is) - Save and click “Publish”
Blog Posts FAQs
How do I change or remove the author’s name from a post?
- When you are in “edit Post,” go to the “Author Byline Override” in the bottom righthand corner of the sidebar and type in the name you want to appear. Every post needs an author, so you cannot remove it entirely, but you can change the name to something general like “The Communications Office.”
How do I change the date of publication for a post?
- When in “edit Post,” go to the top right box labeled “Publish.” There should be a calendar logo with the words “Publish on” followed on by a date/time with an “Edit” hyperlink after that. Click on the “Edit” link to edit the date and time of publication that will appear. This is good to use if you’re logging a old blog posts and want the dates to be accurate.
Additional customization shortcodes for Blogs:
Count (#)
- This determines the maximum number of posts listed in one column until it goes onto a second page. The default is 10, but if you wanted a maximum of 5 posts listed, you would go into the html under the “Text” tab and add: count=”5″ before the closing bracket in the blog shortcode.
Thumbnails (T/F)
- This determines whether you want to show a clickable thumbnail icon next to the title of the issues or not. Similar to the count, you will add: thumbnail=true within the brackets of the shortcode if you wanted a image to appear next to the text on the list of blog posts.
Fulltext (T/F)
- This determines whether or not you want to show the entire post or not. The default is false, so to change this, you would insert: fulltext=true in the blog shortcode.
All together
- If you used all of these, the shortcode would look something like this: [ blog category=”demo” count=”5″ thumbnail=false fulltext=true]